Android Unit Testing with Robolectric

Android development - JAVA/Kotlin Web - Vue js / Ruby on Rails
Starter Code:https://drive.google.com/file/d/1F65MlMRL2q8JT6MS9s98-lr_XfonuN0Z/view?usp=sharing
Final Project: https://drive.google.com/file/d/1Q6vRaG8HVoIQMJWvR1E-xICCjhkuvoer/view?usp=sharing
Robolectric is a framework that brings fast and reliable unit tests to Android. It is an android sandbox and shadows the behavior of objects, view inflation, and resource loading. Robolectric tests run inside the JVM on your workstation in seconds. Developers may overlook testing since it seems like a lot of work. Their managers may also be on their necks to deliver the app thus not enough time to write the unit tests.
However, unit testing is a trivial part of software engineering that you should not overlook because:
- It boosts the developer’s confidence that on pushing code to production, they will not break the previous behavior of the app.
- Unit testing is also a way of documenting code. It prevents leaving behind legacy code for the next developer.
- It enables early failure detection.
- Refactor the NewsFeed app starter code to use Model-View-View-Model architecture.
- Learning how to write unit testing with Robolectric.
Introduction to Testing
There are two approaches taken when it comes to testing:
- Manual testing is where a person builds and runs the app to check whether it meets the users' requirements by performing some user actions. When the app crashes during the test, you check the bug reports to see where the error is. With this approach, however, as more features get added, it becomes cumbersome and code is more error prone
- Automated testing is a technique that verifies that the program meets user requirements. These tests get done by an automation framework. Unlike manual tests that get run by people, computers run automated tests.
Test Automation Pyramid
There are three types of tests:
Local Unit Tests
Local unit tests run on the JVM and don't require a device or emulator as they don't contain any dependencies on the Android framework. They test individual components of code like a function by checking if they perform as expected.In Android Studio, you'll locate them in the module-name/src/test/java/ test source set. Unit testing frameworks include: Mockito and Robolectric
Instrumentation Tests
Instrumentation tests run on a device or emulator since they test code that depends on the android framework. They test actions like the simulation of user clicks, touches, and other system-level events. They are slow since they run in a physical device or emulator.In Android Studio you'll locate them at module-name/src/androidTest/java/ source set. Instrumentation testing frameworks include Espresso and UI Automator 2.0 testing frameworks.
End to End Tests
End-to-end tests evaluate the modules as a whole apps workflow from beginning to end. Unlike unit testing, they test the modules as a group.Robolectric vs Mockito
You'll be learning how to write unit tests. First, you'll learn about the differences between the two main unit testing frameworks in android.Mockito is a framework used to mock Android classes. It helps to test implementation details and not the behavior. Robolectric creates an android sandbox for the code under test. It also shadows the behavior of objects, view inflation, and resource loading.
You must annotate the test class with the framework to invoke when running the tests. Annotation is necessary for jUnit based teasts such as Mockito and Robolectric.
Robolectric uses @RunWith(RobolectricTestRunner.class) annotation while Mockito uses @RunWith(MockitoJUnitRunner.class) annotation.
Getting Started
Download the starter project by clicking on the Download Materials button at the top or bottom of this tutorial. Then open the starter project in Android Studio 4.1.1 or later.Do a code walkthrough to see how the code works. You'll see the stater project organized in packages as shown in the screenshot below:

The source code is organized in folders to separate the different layers of the app. This creates an organized structure for the source code making the codebase easier to navigate. Throughout this tutorial, you'll get to work with the models explained below:
- The model contains data models and network response models.
- The network package contains files with code to make a network request to the NewsApi using Retrofit.
- The news package contains the files responsible for fetching the list of news from the NewsAPI endpoint.
- The newsdetails package contains the NewsDetails.kt file. The file contains code to display the news details once the user clicks on a news list item.
- The utils package contains a Constants file that defines the app constants.

On clicking a news list item, you should see the details screen with the layout shown below:

However, looking throughNewsFeedActivity, you'll see code that handles the network request.. To be able to write effective and efficient unit tests, you should separate UI related code from non-UI related code.
This is necessary since unit tests cover code that contains no dependencies to the android framework. This is because they run on the JVM and not on an actual device.
Therefore, you'll need to separate your code into layers. The activity will only deal with UI-related tasks. Business logic will get implemented on another layer of your application.
In the next section, you'll learn how to architecture your app to aid in the writing of effective unit tests.
Design Architecture
It is important to keep a good design architecture in your apps by having layers to handle the different responsibilities in your app. This approach is known as the separation of concern. It helps you to write specific tests for your code for the different features in your app.In Android, there are some common architectures such as Model View Presenter(MVP) and Model View View Model(MVVM).
MVP
MVP is a design architecture that separates the codebase into these three distinct layers:
- The Model contains your data classes, API connectors, and databases.
- The View is responsible for calling presenter methods for every UI action. Activities and fragments implement the View.
- The Presenter is the middleman between the model and the view. The presenter publishes methods that get called by the view. These methods usually involve fetching data, manipulating it, and deciding what to show in the view.
MVVM
MVVM is an architecture that separates the codebase into these three distinct layers:
- The Model abstracts the data from sources like the network or database. The viewmodel works with the data model to get and save the data.
- The View informs the ViewModel about the user’s actions. It contains the UI-related code that renders the UI to the user in views and layouts e.g activities and fragments.
- The ViewModel abstracts the business logic from the View and publishes data that is relevant to the View. The ViewModel retrieves the necessary data from the Model, applies the UI logic, and then exposes relevant data for the View to consume.
MVVM vs MVP
While both architectures do an amazing job abstracting the view from the apps' logic, with respect to unit testing, the main difference between the two architectures is that:MVVM does not hold any reference to the View since the View subscribes to events handled in the ViewModel. Meanwhile, the Presenter in MVP that tells the View what to display.
This decoupling of the view from the business logic layer makes MVVM a more efficient architecture when writing unit tests.
Refactoring to MVVM
Creating the ViewModel
Locate the news package from the app hierarchy as shown in the screenshot below:
- Open the view package.
- Right-click on the viewmodel package, create a new class, and name it NewsFeedActivityViewModel.
- Open NewsFeedActivityViewModel.kt file and add the code below.
class NewsFeedActivityViewModel : ViewModel() {
  private val newsFeed = MutableLiveData<List<Article>>()
  val news: LiveData<List<Article>> get() = newsFeed
  fun getNews() {
    // 1
    viewModelScope.launch(Dispatchers.IO) {
      // 2
      val result = App.remoteApi.getNewsFeed(QUERY)
      // 3
      if (result is Success) {
        newsFeed.postValue(result.data)
      } else if (result is Failure) {
        Log.d("NetworkFailureHandler", result.toString())
      }
    }
  }
}
Let's go over the code above step by step:
- You launch the network request inside the
viewModelScopebecause it is a long-running operation. -
You should launch coroutines in the viewModelScope since they get canceled when the ViewModel gets cleared. This ensures that your app doesn't hog system resources while in the background.
- Make a network request to get the news feed from the API.
- If the request succeeds, update the
newsFeedLiveData which the View will subscribe to. This will update the news feed list on the UI whenever the View fetches new data. In the case, a failure occurs you log the error message.
Use the ViewModel
Open news/NewsFeedActivity.kt and add the code below before theonCreate() method.
private val viewModel: NewsFeedActivityViewModel by lazy { ViewModelProvider(this).get(NewsFeedActivityViewModel::class.java) }
The code above initializes the NewsFeedActivityViewModel you created earlier.
Replace the code inside networkStatusChecker.performIfConnectedToTheInternet{...} with:
viewModel.getNews()
viewModel.news.observe(this, Observer {
  newsFeedAdapter.setMovies(it)
})
The code above
Now that you have refactored the starter project to use MVVM, you'll be able to write effective unit tests.
Build and run the app, and it should be as it was before you refactoring the app to use MVVM.
Using Robolectric
Setup Robolectric Dependencies
Now open the app/build.gradle file and look at the dependencies block. Ensure you see the dependencies below which will enable you to use Robolectric to write your tests.dependencies {
...
testImplementation "org.robolectric:robolectric:4.4"
testImplementation 'org.robolectric:shadows-httpclient:3.0'
testImplementation "org.robolectric:annotations:4.4"
...
}
The dependencies above help us write unit tests using Robolectric as well as mock a HTTP request using Robolectric.
Mocking HTTP Response using Robolectric
You'll create a test that verifies that the network request gets executed in the ViewModel using Robolectric.Navigate to the test source set as shown in the screenshot below.

Right-click on the test source set and create a new file NewsFeedActivityViewModelTest, then add the code below:
import android.os.Build import org.apache.http.client.methods.HttpGet import org.apache.http.impl.client.DefaultHttpClient import org.apache.http.util.EntityUtils import org.junit.Assert.assertEquals import org.junit.Test import org.junit.runner.RunWith import org.robolectric.RobolectricTestRunner import org.robolectric.annotation.Config import org.robolectric.shadows.httpclient.FakeHttp.addPendingHttpResponse import org.robolectric.shadows.httpclient.TestHttpResponseHere is a walk-through of the code above:// 1 @RunWith(RobolectricTestRunner::class) @Config(sdk = [Build.VERSION_CODES.O_MR1]) class NewsFeedActivityViewModelTest { // 2 @Test fun getNews() { // 3 val client = DefaultHttpClient() // 4 addPendingHttpResponse(TestHttpResponse(200, "Dummy response body")) // 5 val mHttpGetMock = HttpGet("https://newsapi.org/v2/top-headlines") // 6 val responseBody = client.execute(mHttpGetMock) // 7 assertEquals("Dummy response body", EntityUtils.toString(responseBody.entity, "UTF-8")) } }
- The first step is to add the @RunWith(RobolectricTestRunner::class) annotation. The annotation tells the tests in the class to run using Robolectric.
@Testannotation tells JUnit thatgetNews()will contain a unit test.- Initialize a DefaultHttpClient to mock the HTTP request.
- Queue a static HTTP response. Once the HTTP request fires, Robolectric will return the static HTTP response.
- Once the HTTP request fires, the queued static HTTP response gets returned.
- Assign the returned response from the request to
responseBody. - Verify that the response obtained is the static response you had queued earlier.
Creating a test file
You can create a test file for your code by:- Opening the file you want to test.
- Click the class method you want to test, then press Ctrl + Shift + T or (⇧⌘T) if you are using a Mac.
- Click on Create New Test in the Android Studio menu that appears.
- In the Create Test dialog, select any methods to generate then click OK.
- Select the source set corresponding to the type of test you want to create: androidTest for an instrumented test or test for a local unit test. Then click OK
- Right-click on the class name
- Click generate > Test in the menu that will appear.
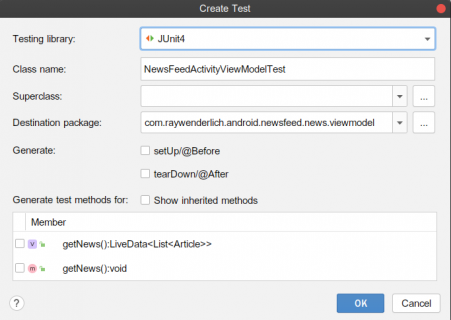
- You'll see a popup similar to the one shown below, select Junit4 from the dropdown and click OK.
 Select the source set you want, in your case the test source set as shown below then click OK. :]

Running the test
Right-click on NewsFeedActivityViewModelTest and select Run 'NewsFeedActivityViewModelTest'You should see the following output in the Run window at the bottom of the screen:

The green checkmarks show that the test in getNews() method passed.
Shadows
Robolectric works by creating a runtime environment that includes the real Android framework code. This means when the code under test calls into the Android framework you get a more realistic experience as for the most part the same code gets executed as would be on a real device.There are limitations, however:
- Native code - Android native code cannot execute on your development machine(JVM).
- Out of process calls - There are no Android system services running on your development machine.
- Inadequate testing APIs - Android includes next to no APIs suitable for testing
These shadow classes avoid the need for a device or an emulator to run the tests.
Create another class named NewsFeedActivityTest. You will create a test that implements Shadows objects in this class. Add the code below to the NewsFeedActivityTest class :
import android.os.Build import com.raywenderlich.android.newsfeed.news.NewsFeedActivity import org.junit.Assert.assertNotNull import org.junit.Before import org.junit.Test import org.junit.runner.RunWith import org.robolectric.Robolectric import org.robolectric.RobolectricTestRunner import org.robolectric.annotation.Config import org.robolectric.annotation.LooperModeThe@RunWith(RobolectricTestRunner::class) @Config(sdk = [Build.VERSION_CODES.O_MR1]) @LooperMode(LooperMode.Mode.PAUSED) class NewsFeedActivityTest {
private var activity: NewsFeedActivity? = null
@Before @Throws(Exception::class) fun setUp() { activity = Robolectric.buildActivity(NewsFeedActivity::class.java) .create() .resume() .get() } }
setUp() method annotated with @Before shows that this method must get executed before each test in the class. It contains code to instantiate NewsFeedActivity.
Add the following test below setUp() :
  @Test
  @Throws(Exception::class)
  fun Activity should not be null() {
    assertNotNull(activity)
  }
The test above verifies that the activity gets initialized.
In NewsFeedActivity, there is a news feed list. On item click, NewsDetailsActivity gets launched. In the test below, you'll verify that the intent to launch NewsDetailsActivity gets triggered on clicking a news item.
Add the code below after Activity should not be null()
@Test
fun Clicking news item should trigger intent to start NewsDetailsActivity() {
  val recyclerView = activity?.findViewById<RecyclerView>(R.id.newsFeed)
  recyclerView?.measure(0, 0)
  recyclerView?.layout(0, 0, 100, 10000)
  // 1
  recyclerView?.findViewHolderForAdapterPosition(0)?.itemView?.performClick()
  // 2
  val intent = Intent().setClass(activity!!, NewsDetailsActivity::class.java)
  activity!!.startActivity(intent)
  // 3
  val startedIntent: Intent = shadowOf(activity).nextStartedActivity
  // 4
  assertNotNull(startedIntent)
  // 5
  assertThat(startedIntent, equalTo(intent))
}
The test above,
- Simulates the action of clicking the first item in the news feed
- Create the intent you expect to launch NewsDetailsActivity when the user clicks on a news feed item.
- An activity doesn't expose a way to find out about the activities it launches. However, Robolectric's ShadowActivity(
shadowOf(activity) keeps track of all launched activities. It exposes this information through thenextStartedActivitymethod. You thus get the activity that started on news item getting clicked. - Verify that the intent started.
- Verify that the expected intent and the launched intent intents fire the same action.
Note: You'll not be making sure that an activity has started since that will involve testing the Android framework. The activity might fail to start because of something in the framework that you've no control over that and you've no idea why the test is failing.
The code you wrote above only checks whether the code to start an activity gets triggered and not whether the activity actually got started.
Additional Robolectric Tests
In this section, you'll get to add more Robolectric tests.Right-click on the test source set and create a new class NewsDetailsActivityTest and then add the code below
import android.content.Intent import android.net.Uri import android.os.Build import android.widget.Button import com.raywenderlich.android.newsfeed.R import org.junit.Assert.assertEquals import org.junit.Assert.assertNotNull import org.junit.Before import org.junit.Test import org.junit.runner.RunWith import org.robolectric.Robolectric import org.robolectric.RobolectricTestRunner import org.robolectric.annotation.Config import org.robolectric.shadows.ShadowToastThis is what the code above does:@RunWith(RobolectricTestRunner::class) @Config(sdk = [Build.VERSION_CODES.O_MR1]) class NewsDetailsActivityTest {
private var activity: NewsDetailsActivity? = null
@Before @Throws(Exception::class) fun setUp() { activity = Robolectric.buildActivity(NewsDetailsActivity::class.java) .create() .resume() .get() }
// 1 @Test @Throws(Exception::class) fun
Activity should not be null() { assertNotNull(activity) }// 2 @Test fun
Clicking read more button triggers intent to launch browser() { val readMoreButton = activity?.findViewById<Button>(R.id.readMore) readMoreButton?.performClick() val uri = Uri.parse("https://www.google.com") val intent = Intent(Intent.ACTION_VIEW, uri) assertEquals(intent.action, (Intent.ACTION_VIEW)) }// 3 @Test @Throws(java.lang.Exception::class) fun
readMore button click shows toast message() { val view = activity?.findViewById(R.id.readMore) as Button assertNotNull(view) view.performClick() assertEquals(ShadowToast.getTextOfLatestToast(), ("Launching browser!")) } }
- Verify that the NewsDetailsActivity gets instantiated thus not null.
- In the NewsDetailsActivity, clicking the
readMebutton triggers an intent to launch the browser and open the specified URL. You thus verify that the intent to launch the browser gets triggered by clicking thereadMorebutton. - Once the user clicks the
readMorebutton, a toast message gets displayed n their screen. In the method,readMore button click shows toast message()readMorebutton. To create a toast shadow object you useShadowToast.getTextOfLatestToast()to verify the toast message displayed to the user.
Robolectric with AndroidX Test
With AndroidX tests, you can now write UI related tests that get executed on the JVM. AndroidX tests thus making testing UI related code fast since the tests are not executed on an actual device or emulator.Using the AndroidX Test APIs reduces the cognitive load for you as a developer, with just one set of APIs to learn for the same Android concept, no matter if you are writing a Robolectric test or an instrumentation test.
It is now possible to use the AndroidX test runner in Robolectric tests. You add the @RunWith(AndroidJUnit4::class) annotation to the test class.
Inside the test source set, create another file and name it NewsFeedActivityViewTest and add the code below to it.
import android.os.Build import androidx.test.core.app.ActivityScenario import androidx.test.espresso.Espresso.onView import androidx.test.espresso.assertion.ViewAssertions.matches import androidx.test.espresso.matcher.ViewMatchers.isClickable import androidx.test.espresso.matcher.ViewMatchers.withId import androidx.test.ext.junit.runners.AndroidJUnit4 import com.raywenderlich.android.newsfeed.R import com.raywenderlich.android.newsfeed.news.NewsFeedActivity import org.junit.Test import org.junit.runner.RunWith import org.robolectric.annotation.ConfigThe test above launches NewsFeedActivity. It then verifies that an item on the newsFeed Recyclerview is clickable.@RunWith(AndroidJUnit4::class) @Config(sdk = [Build.VERSION_CODES.O_MR1]) class NewsFeedActivityViewTest {
@Test fun
List is visible on app launch() { ActivityScenario.launch(NewsFeedActivity::class.java).use { scenario -> scenario.onActivity { onView(withId(R.id.newsFeed)).check(matches(isClickable())) } } } }
Run the tests in NewsFeedActivityViewTest and you should see one green checkmark on the run window showing that the test passed.
Robolectric plugin for Chrome
Robolectric tests run inside a sandbox. It allows you to configure the Android environment to the desired conditions for each test. Robolectric extends the Android framework using test APIs. These APIs provide minute control over the Android framework’s behavior. It also provides visibility of the state for assertions.While much of the Android framework will work as expected inside a Robolectric test, some Android components’ regular behavior doesn’t translate well to unit tests example hardware sensors need simulation. In those cases, Robolectric provides a test double that’s suitable for most unit testing scenarios.
You can find documentation for Robolectric’s test APIs by installing the Robolectric plugin for Chrome. You can also visit the Android API Reference.
Where to go from here?
Congratulations! You’ve just learned the basics of using Robolectric for unit testing. You've refactored the starter project to use MVVM for efficient implementation of unit tests.You can download the finished project by clicking the Download Materials button at the top or bottom of the tutorial.
To learn more about tests I suggest reading the articles below
- To learn about Mockito, please have a look at the Android Unit Testing with Mockito.
- For in-depth knowledge about design patterns check out our Design Patterns Book: MVVM tutorial
- Dependency injection: In order to make your app more testable, it’s good to have your dependencies injected somehow. This Dagger in Multi-Module Clean Applications will help you with that.
- Espresso codelab: If you’re wondering how UI tests get done, this codelab from Google Developers will help you get started.
- To gain more testing knowledge, check out our book, Android Test-Driven Development by Tutorials.


